Build a Hamburger Menu in React Using Framer Motion
By Hemanta Sundaray on 2023-02-05
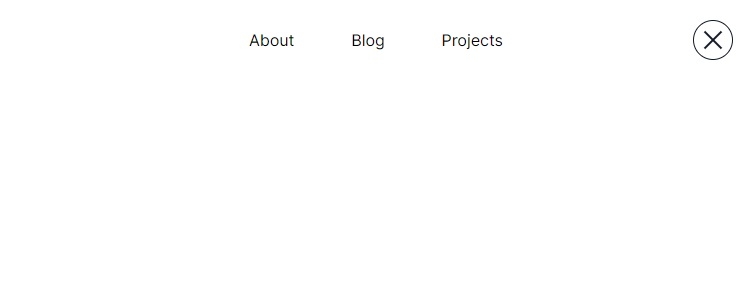
In this blog post, I will show you how to build a hamburger menu in React using Framer Msotion. The end result will look like this:
The menu in its closed state:
The menu in its open state:
Prerequisite
This blog post assumes that you have a starter React project ready with Framer Motion and Tailwind CSS libraries installed.
With these prerequisites in place, let’s get started!
Create a Menu component
In the src directory, create a directory named components. Inside the components directory, create a file named Menu.js with the following code snippet:
import React from "react"
import { motion } from "framer-motion"

const lineOneVariants = {
  initial: {
    rotate: "0deg",
    transition: {
      ease: "easeOut",
    },
  },
  animate: {
    y: "3px",
    rotate: "45deg",
    transformOrigin: "center center",
    transition: {
      ease: "easeOut",
    },
  },
}

const lineTwoVariants = {
  initial: { rotate: "0deg" },
  animate: {
    y: "-3px",
    rotate: "-45deg",
    transformOrigin: "center center",
    transition: {
      ease: "easeOut",
    },
  },
}

const Menu = ({ menuOpen, cycleMenuOpen }) => {
  return (
    <div className="grid place-items-center fixed top-6 right-6 border border-gray-900 w-10 h-10 rounded-full">
      <motion.div
        className="flex flex-col justify-between w-6 h-2 cursor-pointer"
        onClick={cycleMenuOpen}
      >
        <motion.div
          variants={lineOneVariants}
          initial="initial"
          animate={menuOpen ? "animate" : "initial"}
          className="bg-gray-900 w-full h-0.5"
        ></motion.div>
        <motion.div
          variants={lineTwoVariants}
          initial="initial"
          animate={menuOpen ? "animate" : "initial"}
          className="bg-gray-900 w-full h-0.5"
        ></motion.div>
      </motion.div>
    </div>
  )
}

export default Menu
Above, we have defined two variants: lineOneVariants and lineTwoVariants that specify the initial state and the animation state of two lines (representing the hamburger menu). These variants are used to create animations by passing them into motion components via the variants prop.
The Menu component receives two props: menuOpen and cycleMenuOpen. The menuOpen prop determines the state of the menu (open or closed), while the cycleMenuOpen prop is a callback function to toggle the state of the menu.
Create a Navigation component
Next, inside the components directory, create a file named Navigation.js with the following code snippet:
import React from "react"
import { motion, AnimatePresence } from "framer-motion"

const navigationVariants = {
  initial: {
    x: "-0.2rem",
    opacity: 0,
    transition: {
      ease: "easeOut",
      staggerChildren: 0.1,
    },
  },
  animate: {
    x: 0,
    opacity: 1,
    transition: {
      ease: "easeOut",
      staggerChildren: 0.1,
    },
  },
}

const Navigation = ({ menuOpen }) => {
  return (
    <AnimatePresence>
      {menuOpen && (
        <nav className="grid place-items-center w-1/3 h-10 m-auto mt-6">
          <motion.ul
            variants={navigationVariants}
            initial="initial"
            animate="animate"
            exit="initial"
            className="flex justify-between w-full"
          >
            <motion.li variants={navigationVariants}>About</motion.li>
            <motion.li variants={navigationVariants}>Blog</motion.li>
            <motion.li variants={navigationVariants}>Projects</motion.li>
          </motion.ul>
        </nav>
      )}
    </AnimatePresence>
  )
}

export default Navigation
Above, the variant navigationVariants specifies two states for the navigation menu: initial and animate. The initial state defines a position to the left and opacity of 0, with a transition that staggers children elements by 0.1s. The animate state defines a position of 0 and opacity of 1, with the same transition for children elements.
The Navigation component receives a single prop, menuOpen, which determines whether the navigation menu should be displayed or not. When menuOpen is false, the navigation menu is not displayed, but when menuOpen is true, the navigation menu animates into view with the transition defined in the navigationVariants object.
staggerChildren
Inside the transition object, the staggerChildren property is used to stagger the animation of multiple children elements. This property specifies the amount of delay between the animation of each child element. In this code, the staggerChildren is set to 0.1, meaning there will be a delay of 0.1 seconds between the animation of each child motion.li element.
Notice that the
initialandanimateprops are not specified on themotion.lielements because these props are already defined on the parentmotion.ulelement. This means that the childmotion.lielements inherit the sameinitialandanimatestates, so it's not necessary to repeat them for each child.
Find out more about staggerChildren in my blog post here.
AnimatePresence
AnimatePresence provides a way for developers to create animations for components that are being removed from the React tree. It keeps the elements in the DOM long enough to complete the animation before they're finally removed.
Render Menu & Navigation Components Inside the App Component
Finally, render the Menu and Navigation components inside the App component as shown below:
import React from "react";
import Menu from "./components/Menu";
import Navigation from "./components/Navigation";
import { useCycle } from "framer-motion";

const App = () => {
  const [menuOpen, cycleMenuOpen] = useCycle(false, true);

  return (
    <>
      <Menu menuOpen={menuOpen} cycleMenuOpen={cycleMenuOpen} />
      <Navigation menuOpen={menuOpen} />
    </>
  );
};

export default App;
Here, we have made use of the useCycle hook from Framer Motion to manage the state of the menu (open or closed). The useCycle hook is a utility hook that allows for cycling between two or more values. It works similar to useState in React.
In this case, the hook is used to manage the state of the menu, which is either open or closed. The hook takes two arguments: false (the menu is closed) and true (the menu is open). And it returns an array containing two values: the current state (~menuOpen~~) and a function to change the state (cycleMenuOpen).
The current state of the menu (menuOpen) is passed as a prop to both the Menu and Navigation components, allowing them to change their behavior based on whether the menu is open or closed. The cycleMenuOpen function is passed to the Menu component and is used to toggle the menu open and closed when the hamburger icon is clicked.
And that's it! With just a few simple steps, we have successfully created a hamburger menu with smooth animations using Framer Motion.

