Add Breadcrumbs to Your Next.js App With This Simple Guide
By Hemanta Sundaray on 2023-04-03
In this blog post, you will learn how to add breadcrumb navigation to your Next.js app, making it easier for users to keep track of their location within the site. But before we get started, let's talk about what breadcrumbs are.
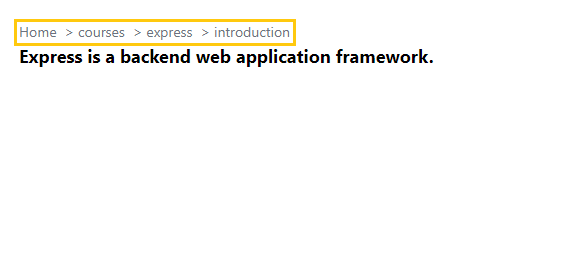
Breadcrumbs are navigation elements that show the user's current location within a website or application. They are typically displayed at the top of the page and provide a way for users to quickly navigate to higher-level pages. Here is how the breadcrumb in our Next.js app will look like:
Now that you know what breadcrumbs are, let's get started.
Prerequisites
Before we begin, you should have a starter Next.js app ready with Tailwind CSS already installed. This guide assumes that you have a basic understanding of Next.js and Tailwind CSS.
Below, we will create the necessary directory structure and files to add breadcrumbs to our Next.js app in 4 simple steps:
Step 1
To begin, replace the code inside the index.js file, located inside the pages folder with the following:
import React from "react"

const Index = () => {
  return <h1 className="m-6 font-bold text-2xl">Welcome Home!</h1>
}

export default Index
Step 2
Create a directory called courses inside the Pages directory. Inside the courses directory, create a new file called index.js. Copy and paste the following code snippet inside the index.js file:
import React from "react"

const Index = () => {
  return <h1 className="m-6 font-bold text-2xl">Courses</h1>
}

export default Index
Next, inside the courses directory, create a new directory called express. Inside the express directory, create two new files: index.js and introduction.js.
The index.js file should look like this:
import React from "react"

const Index = () => {
  return <h1 className="m-6 font-bold text-2xl">Express</h1>
}

export default Index
The introduction.js file should look like this:
import React from "react"

const Introduction = () => {
  return (
    <div className="m-6">
      <p className="text-lg font-bold">
        Express is a backend web application framework.
      </p>
    </div>
  )
}

export default Introduction
This introduction.js file is where we would place our breadcrumb.
Step 3
Finally, create a new directory called utils in your src directory. Inside the utils directory, create a new file called breadcrumbs.js. This file will contain the logic for generating the breadcrumbs.
Copy the following code snippet and paste it into your breadcrumbs.js file:
import React, { useEffect, useState } from "react"
import { useRouter } from "next/router"
import Link from "next/link"

const Breadcrumbs = () => {
  const [breadcrumbs, setBreadcrumbs] = useState(null)

  const router = useRouter()

  useEffect(() => {
    if (router) {
      const linkPath = router.asPath.split("/")
      linkPath.shift()

      const pathArray = linkPath.map((path, i) => {
        return {
          breadcrumb: path,
          href: "/" + linkPath.slice(0, i + 1).join("/"),
        }
      })

      setBreadcrumbs(pathArray)
    }
  }, [router])

  if (!breadcrumbs) {
    return null
  }

  return (
    <nav className="text-sm text-gray-500">
      <ol className="flex space-x-2">
        <li className="hover:text-blue-500">
          <Link href="/">Home</Link>
        </li>
        {breadcrumbs.map(breadcrumb => {
          return (
            <Link href={breadcrumb.href} key={breadcrumb.href}>
              <li className="before:content-['>'] before:mr-1 hover:text-blue-500">
                {breadcrumb.breadcrumb}
              </li>
            </Link>
          )
        })}
      </ol>
    </nav>
  )
}

export default Breadcrumbs
Let's break down this code snippet:
The Breadcrumbs component is defined with the state of breadcrumbs and setBreadcrumbs. Inside the component, we are using the useRouter hook to get the current router object and the useEffect hook to listen to the changes in the router.
Inside the useEffect hook, we are splitting the current path by '/' and then removing the first element of the resulting array. After that, we are mapping over the linkPath array and creating a new array called pathArray that contains an object with two keys: breadcrumb and href. breadcrumb is the current path part and href is the concatenation of all path parts up to the current path part. Finally, we set the breadcrumb state to the new pathArray.
Then we have a check if breadcrumbs is null. If true, we return null. Finally, we have the JSX code for the breadcrumbs navigation bar. We are using the Link component to create the links and map over the breadcrumbs array to generate the links.
Step 4
Now that you have the breadcrumbs.js file in place, let's import it into the Introduction page where we want to display the breadcrumbs.
In the introduction.js file inside the express directory, import the breadcrumbs.js file and add it to the JSX code, as shown below:
import React from "react"
import Breadcrumbs from "@/utils/BreadCrumbs"

const Introduction = () => {
  return (
    <div className="m-6">
      <Breadcrumbs />
      <p className="text-lg font-bold">
        Express is a backend web application framework.
      </p>
    </div>
  )
}

export default Introduction
Once you've imported and added the Breadcrumbs component, naviage to http://localhost:3000/courses/express/introduction, and you'll be able to see the breadcrumbs in action.
Keep in mind that the Breadcrumbs component is reusable, so you can use it wherever you need breadcrumbs in your app.
Conclusion
This guide covered the basic steps needed to implement breadcrumbs in your app, but you can customize it to suit your needs. Now that you know how to implement breadcrumbs in your app, you can enhance the user experience and make it easier for users to navigate through your app.
