A Complete Guide to Mutations in React Query - Part 3 - Using the useMutation Hook to Create Resources on the Server.
By Hemanta Sundaray on 2022-09-16
This blog post is part of a series. You must complete part-1 & part-2 before continuing here.
In part-2, we fetched a list of blog posts from the http://localhost:5000/posts end point using the useQuery hook and displayed them on the Posts page.
In this post, we will learn how to create resources on the server using the useMutation hook. Let’s get started.
First, let's create a Create Post button on the Posts page. Clicking on the Create Post button will take us to the /posts/create route, which will load the <CreatePost /> component (which we have not created yet).
Add the highlighted code snippets in the Posts.js file.
import React from "react";
import { Link } from "react-router-dom";
import { useGetPosts } from "./postHooks";

const Posts = () => {
  const { isLoading, isError, error, data: posts } = useGetPosts();

  return (
    <div className="w-1/2 m-auto mt-6">
      <Link to="/posts/create">
        <button className="bg-blue-500 text-gray-50 px-2 py-1 rounded hover:bg-blue-600">
          Create Post
        </button>
      </Link>

      <h1 className="text-2xl font-bold mb-2">Blog Posts</h1>
      {isLoading ? (
        <p>Loading...</p>
      ) : isError ? (
        <p>{error.message}</p>
      ) : (
        posts.map(({ id, title }) => (
          <Link key={id} to={`/posts/${id}`}>
            <h1>{title}</h1>
          </Link>
        ))
      )}
    </div>
  );
};

export default Posts;
Creating a React form using the Formik library
Next, inside the components folder, create a file named CreatePost.js. Copy and paste the following code snippet in the CreatePost.js file.
import React from "react";
import { Formik, Field, Form, ErrorMessage } from "formik";
import * as Yup from "yup";

const CreatePost = () => {
  return (
    <Formik
      initialValues={{ title: "", body: "" }}
      validationSchema={Yup.object({
        title: Yup.string().required("Required"),
        body: Yup.string().required("Required"),
      })}
      onSubmit={(values) => {
        console.log(values);
      }}
    >
      <Form className="w-1/3 flex flex-col bg-white shadow-md rounded mt-6 px-8 py-8 m-auto">
        <div className="flex flex-col mb-4">
          <label
            htmlFor="title"
            className="text-gray-700 text-sm font-bold mb-2"
          >
            Title
          </label>
          <Field
            name="title"
            type="text"
            className="shadow appearance-none border rounded py-1 px-2 text-gray-700 leading-tight focus:outline-none focus:shadow-outline"
            id="username"
          />
          <ErrorMessage name="title" />
        </div>

        <div className="flex flex-col mb-4">
          <label
            htmlFor="body"
            className="text-gray-700 text-sm font-bold mb-2"
          >
            Body
          </label>
          <Field
            name="body"
            as="textarea"
            type="text"
            className="shadow appearance-none border rounded mb-1 py-1 px-2 text-gray-700 leading-tight focus:outline-none focus:shadow-outline"
          />
          <ErrorMessage name="body" />
        </div>

        <button
          type="submit"
          className="bg-blue-600 text-gray-50 px-2 py-1 rounded hover:bg-blue-700"
        >
          Create Post
        </button>
      </Form>
    </Formik>
  );
};

export default CreatePost;
Here, we have used the Formik library to create the form. Note that the values variable (on line 13) contains the form data. At present, we are just logging the form data to the console. Shortly, we will learn how to use the useMutation hook to POST the form data to the server.
Next, add the highlighted code snippets in the App.js file.
import React from "react";
import { Routes, Route } from "react-router-dom";
import Posts from "./components/Posts";
import SinglePost from "./components/SinglePost";
import CreatePost from "./components/CreatePost";

const App = () => {
  return (
    <Routes>
      <Route path="/" element={<Posts />} />
      <Route path="/posts/:id" element={<SinglePost />} />
      <Route path="/posts/create" element={<CreatePost />} />
    </Routes>
  );
};

export default App;
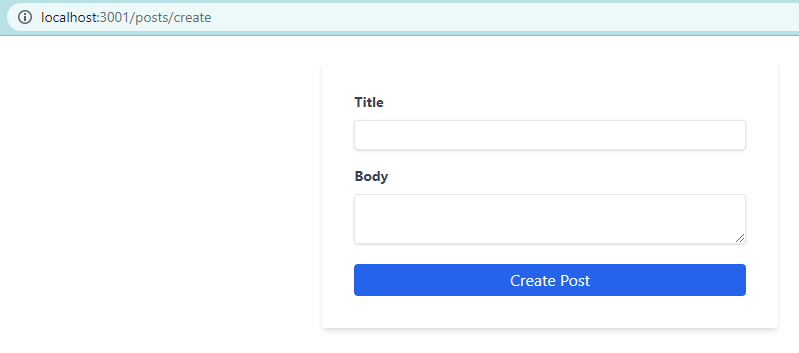
Now, if we click on the Create Post button on the Post page, we see the following form.
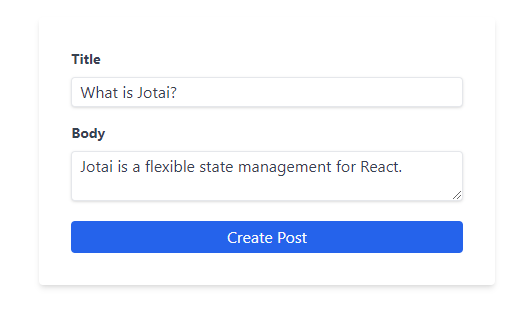
If we fill the title and body
and click on the CreatePost button, we will see the form data contained inside the values variable.
Now, add the highlighted code snippets in CreatePost.js file.
import React from "react"
import { useNavigate } from "react-router-dom"
import { Formik, Field, Form, ErrorMessage } from "formik"
import * as Yup from "yup"
import { useMutation, useQueryClient } from "@tanstack/react-query"
import axios from "axios"

const CreatePost = () => {
  const queryClient = useQueryClient()
  const navigate = useNavigate()

  const mutation = useMutation(
    postData => {
      return axios.post("http://localhost:5000/posts", postData)
    },
    {
      onSuccess: () => {
        // invalidate & refetch
        queryClient.invalidateQueries(["posts"])
        navigate("/")
      },
    }
  )
  return (
    <Formik
      initialValues={{ title: "", body: "" }}
      validationSchema={Yup.object({
        title: Yup.string().required("Required"),
        body: Yup.string().required("Required"),
      })}
      onSubmit={values => {
        mutation.mutate(values)
      }}
    >
      <Form className="w-1/3 flex flex-col bg-white shadow-md rounded mt-6 px-8 py-8 m-auto">
        <div className="flex flex-col mb-4">
          <label
            htmlFor="title"
            className="text-gray-700 text-sm font-bold mb-2"
          >
            Title
          </label>
          <Field
            name="title"
            type="text"
            className="shadow appearance-none border rounded py-1 px-2 text-gray-700 leading-tight focus:outline-none focus:shadow-outline"
            id="username"
          />
          <ErrorMessage name="title" />
        </div>

        <div className="flex flex-col mb-4">
          <label
            htmlFor="body"
            className="text-gray-700 text-sm font-bold mb-2"
          >
            Body
          </label>
          <Field
            name="body"
            as="textarea"
            type="text"
            className="shadow appearance-none border rounded mb-1 py-1 px-2 text-gray-700 leading-tight focus:outline-none focus:shadow-outline"
          />
          <ErrorMessage name="body" />
        </div>

        <button
          type="submit"
          className="bg-blue-600 text-gray-50 px-2 py-1 rounded hover:bg-blue-700"
        >
          Create Post
        </button>
      </Form>
    </Formik>
  )
}

export default CreatePost
Let’s understand the code snippets that we have added.
Understanding the anatomy of the useMutation hook
The first argument to the useMutation hook is a mutation function. In our code snippet above, the mutation function accepts the form data as the argument and uses the axios HTTP client to POST the form data to the http://localhost:5000/post end point.
Notice that we have used the mutate() function on line 32 to pass the form data to the mutation function.
Invalidating & refetching the query with the posts query key
After we successfully create a blog post, the list of blog posts on the Posts page becomes out of sync with the list of blog posts on the server. The server state contains the new post, but not the Posts page.
How can we then show the new post on the Posts page?
We can show the new post by invalidating and refetching any query with the posts query key. To do this, we can use the useMutation’s onSuccess option and the client’s invalidateQueries function.
Notice that, on line 20, after we successfully create a new blog post, we get navigated to the root / route, which loads the <Post /> component.
To see the blog post creation in action, fill the form with a title and a body
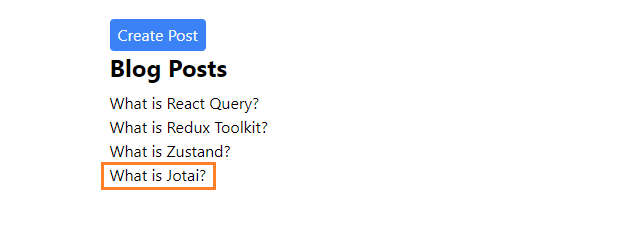
and click on the Create Post button. We get directed to the Posts page and we see the new post.
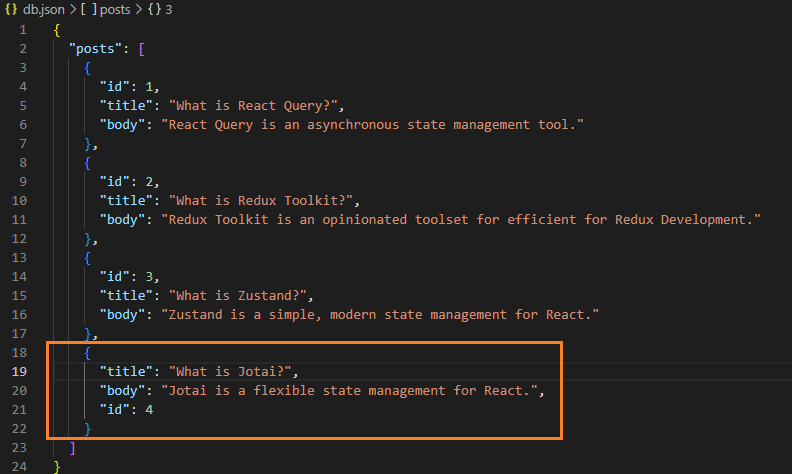
Remember that we are using JSON Server as our backend. In part-1, I told you that when we create a resource on the server, the changes will be automatically saved in the db.json file.
Check the db.json file; you should see the new post added to the posts array.
Hurray! Now you know how to use the useMutation hook to create resources on the server.
We are not done yet.
Error handling with the onError callback
What if our mutation (creation of a blog post) encounters an error?
Well, to handle errors, useMutation provides an onError callback.
Let’s simulate an error by POSTing the form data to a wrong API endpoint.
Add the highlighted code snippets in the CreatePost.js file. Also, make sure to remove the s from /posts inside the mutation function. Remember, the http://localhost:5000/post end point does not exist.
import React, { useState } from "react";
import { useNavigate } from "react-router-dom";
import { Formik, Field, Form, ErrorMessage } from "formik";
import * as Yup from "yup";
import { useMutation, useQueryClient } from "@tanstack/react-query";
import axios from "axios";

const CreatePost = () => {
  const [error, setError] = useState(null);

  const queryClient = useQueryClient();
  const navigate = useNavigate();

  const mutation = useMutation(
    (postData) => {
      return axios.post("http://localhost:5000/post", postData);
    },
    {
      onSuccess: () => {
        // invalidate & refetch
        queryClient.invalidateQueries(["posts"]);
        navigate("/");
      },
      onError: ({ message }) => {
        setError(message);
      },
    }
  );
  return (
    <>
      {error && (
        <div className="w-1/3 flex justify-center items-center bg-red-400 rounded mt-4 px-2 py-2 m-auto">
          <p>{error}</p>
        </div>
      )}
      <Formik
        initialValues={{ title: "", body: "" }}
        validationSchema={Yup.object({
          title: Yup.string().required("Required"),
          body: Yup.string().required("Required"),
        })}
        onSubmit={(values) => {
          mutation.mutate(values);
        }}
      >
        <Form className="w-1/3 flex flex-col bg-white shadow-md rounded mt-6 px-8 py-8 m-auto">
          <div className="flex flex-col mb-4">
            <label
              htmlFor="title"
              className="text-gray-700 text-sm font-bold mb-2"
            >
              Title
            </label>
            <Field
              name="title"
              type="text"
              className="shadow appearance-none border rounded py-1 px-2 text-gray-700 leading-tight focus:outline-none focus:shadow-outline"
              id="username"
            />
            <ErrorMessage name="title" />
          </div>

          <div className="flex flex-col mb-4">
            <label
              htmlFor="body"
              className="text-gray-700 text-sm font-bold mb-2"
            >
              Body
            </label>
            <Field
              name="body"
              as="textarea"
              type="text"
              className="shadow appearance-none border rounded mb-1 py-1 px-2 text-gray-700 leading-tight focus:outline-none focus:shadow-outline"
            />
            <ErrorMessage name="body" />
          </div>

          <button
            type="submit"
            className="bg-blue-600 text-gray-50 px-2 py-1 rounded hover:bg-blue-700"
          >
            Create Post
          </button>
        </Form>
      </Formik>
    </>
  );
};

export default CreatePost;
Fill the form with a title and a body and click on the Create Post button. You will see an error:
Using the isLoading boolean
There is one more improvement we can make to the user experience. When we click on the Create Post button, we make a network request to the server. When the network request is in progress (In other words, while the mutation is currently running), let’s change the button text from Create Post to Creating… Post. You can also choose to show a spinner next to the text.
Make the highlighted changes in the Create Post.js file.
import React, { useState } from "react";
import { useNavigate } from "react-router-dom";
import { Formik, Field, Form, ErrorMessage } from "formik";
import * as Yup from "yup";
import { useMutation, useQueryClient } from "@tanstack/react-query";
import axios from "axios";

const CreatePost = () => {
  const [error, setError] = useState(null);

  const queryClient = useQueryClient();
  const navigate = useNavigate();

  const { mutate, isLoading } = useMutation(
    (postData) => {
      return axios.post("http://localhost:5000/posts", postData);
    },
    {
      onSuccess: () => {
        // invalidate & refetch
        queryClient.invalidateQueries(["posts"]);
        navigate("/");
      },
      onError: ({ message }) => {
        setError(message);
      },
    }
  );
  return (
    <>
      {error && (
        <div className="w-1/3 flex justify-center items-center bg-red-400 rounded mt-4 px-2 py-2 m-auto">
          <p>{error}</p>
        </div>
      )}
      <Formik
        initialValues={{ title: "", body: "" }}
        validationSchema={Yup.object({
          title: Yup.string().required("Required"),
          body: Yup.string().required("Required"),
        })}
        onSubmit={(values) => {
          mutate(values);
        }}
      >
        <Form className="w-1/3 flex flex-col bg-white shadow-md rounded mt-6 px-8 py-8 m-auto">
          <div className="flex flex-col mb-4">
            <label
              htmlFor="title"
              className="text-gray-700 text-sm font-bold mb-2"
            >
              Title
            </label>
            <Field
              name="title"
              type="text"
              className="shadow appearance-none border rounded py-1 px-2 text-gray-700 leading-tight focus:outline-none focus:shadow-outline"
              id="username"
            />
            <ErrorMessage name="title" />
          </div>

          <div className="flex flex-col mb-4">
            <label
              htmlFor="body"
              className="text-gray-700 text-sm font-bold mb-2"
            >
              Body
            </label>
            <Field
              name="body"
              as="textarea"
              type="text"
              className="shadow appearance-none border rounded mb-1 py-1 px-2 text-gray-700 leading-tight focus:outline-none focus:shadow-outline"
            />
            <ErrorMessage name="body" />
          </div>

          <button
            type="submit"
            className="bg-blue-600 text-gray-50 px-2 py-1 rounded hover:bg-blue-700"
          >
            {isLoading ? "Creating... Post" : "Create Post"}
          </button>
        </Form>
      </Formik>
    </>
  );
};

export default CreatePost;
We use the isLoading boolean to determine what text to show inside the form submit button.
Now, fill the form with a title and a body and hit the Create Post button. You should see the text Creating... Post before the mutation succeeds.
Creating a custom hook
Finally, let's extract the mutation logic to a custom hook named useCreatePost() inside the postHooks.js file.
import { useNavigate } from "react-router-dom";
import { useQuery, useMutation, useQueryClient } from "@tanstack/react-query";
import axios from "axios";

export const useGetPosts = () => {
  return useQuery(["posts"], async () => {
    const { data } = await axios.get(`http://localhost:5000/posts`);
    return data;
  });
};

export const useGetSinglePostById = (id) => {
  console.log(id);
  return useQuery(["posts", id], async () => {
    const { data } = await axios.get(`http://localhost:5000/posts/${id}`);
    return data;
  });
};

export const useCreatePost = (setError) => {
  const queryClient = useQueryClient();
  const navigate = useNavigate();
  return useMutation(
    (postData) => {
      return axios.post("http://localhost:5000/posts", postData);
    },
    {
      onSuccess: () => {
        queryClient.invalidateQueries(["posts"]);
        navigate("/");
      },

      onError: ({ message }) => {
        setError(message);
      },
    }
  );
};
Next, make the highlighted changes in the CreatePost.js file.
import React, { useState } from "react";
import { Formik, Field, Form, ErrorMessage } from "formik";
import * as Yup from "yup";
import { useCreatePost } from "./postHooks";

const CreatePost = () => {
  const [error, setError] = useState(null);

  const { mutate, isLoading } = useCreatePost(setError);

  return (
    <>
      {error && (
        <div className="w-1/3 flex justify-center items-center bg-red-400 rounded mt-4 px-2 py-2 m-auto">
          <p>{error}</p>
        </div>
      )}
      <Formik
        initialValues={{ title: "", body: "" }}
        validationSchema={Yup.object({
          title: Yup.string().required("Required"),
          body: Yup.string().required("Required"),
        })}
        onSubmit={(values) => {
          mutate(values);
        }}
      >
        <Form className="w-1/3 flex flex-col bg-white shadow-md rounded mt-6 px-8 py-8 m-auto">
          <div className="flex flex-col mb-4">
            <label
              htmlFor="title"
              className="text-gray-700 text-sm font-bold mb-2"
            >
              Title
            </label>
            <Field
              name="title"
              type="text"
              className="shadow appearance-none border rounded py-1 px-2 text-gray-700 leading-tight focus:outline-none focus:shadow-outline"
              id="username"
            />
            <ErrorMessage name="title" />
          </div>

          <div className="flex flex-col mb-4">
            <label
              htmlFor="body"
              className="text-gray-700 text-sm font-bold mb-2"
            >
              Body
            </label>
            <Field
              name="body"
              as="textarea"
              type="text"
              className="shadow appearance-none border rounded mb-1 py-1 px-2 text-gray-700 leading-tight focus:outline-none focus:shadow-outline"
            />
            <ErrorMessage name="body" />
          </div>

          <button
            type="submit"
            className="bg-blue-600 text-gray-50 px-2 py-1 rounded hover:bg-blue-700"
          >
            {isLoading ? "Creating... Post" : "Create Post"}
          </button>
        </Form>
      </Formik>
    </>
  );
};

export default CreatePost;
Part-3 of the series is complete. In part-4, we will learn how to update a blog post using the useMutation hook.
